Listed below are the instructions to update the Firmware for Canon EOS Digital Cameras.

NOTE: Firmware Update Cautions
- If the power is cut off during the firmware update, the camera may malfunction
- Use a fully charged Battery Pack of dedicated AC Adapter Kit (Optional) for firmware update
- Please be absolutely sure not to turn the camera's power switch to OFF during the firmware update
- During the firmware update, please do not open the card slot cover
- During the firmware update, please do not operate any of the camera's buttons, dials or switches
- Before the firmware update, please remove the lens, external Speelite and all other accessories from the camera
Firmware Update Preperation
The following items are required to perform a firmware update. Please prepare these items in advance before performing the update.
- Camera body: The camera on which you will perform the firmware update
- Power supply: Dedicated Battery Pack (The battery pack must be fully charged) or dedicated AC Adapter Kit (optional)
- Card: Memory card supported by the camera * Please see the camera's instruction manual for details on which memory cards are supported by each camera model
- USB cable: USB cable supported by the camera
- Card Reader: Commerically available memory card reader (the PC's card slot can also be used)
- Firmware update file: The downloaded firmware file
How To Update The Firmware
Update the firmware using either one of the methods below.
- Use the card reader to update the camera's firmware
- Use EOS Utility and a USB cable (supported by the camera) to update the camera's firmware

NOTE: The method of using EOS Utility to update the firmware is not supported on some camera models. If it is not supported, perform the update according to "Use The Card Reader To Update The Camera's Firmware"
Use The Card Reader To Update The Camera's Firmware
The camera operations and the menu's display format/structure may differ depending on the model.
Copy the firmware to the card
- Initialize/format the card with the camera. As this will erase the contents of your memory card, backing up your images/videos to your computer before performing this step is recommended.
*Please see the cameras's instruction manual for information on how to inialize/format the card
- Insert the card into the card reader and copy the downloaded firmware file to card's root directory
*The firmware file is contained within the Firmware download from our support website and has a *.fir file extension
Update the firmware
- Remove the card from the card reader and insert into the camera
- Turn the camera's power on and set the shooting mode to <P> mode
- Press the <Menu> button to display the menu
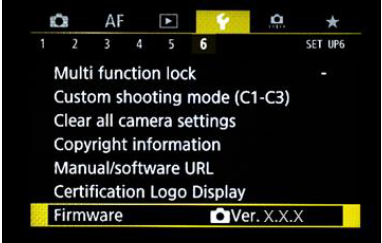
- Select <Firmware Ver.X.X.X> from the <Setup> tab on the menu and press the <SET> button
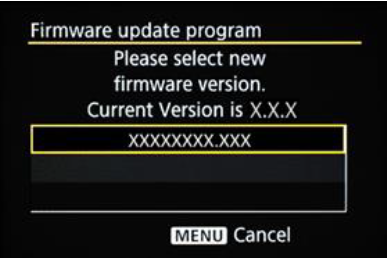
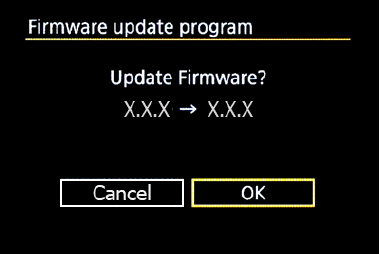
- When the firmware update screen is displayed, select <OK> and press the <SET> button
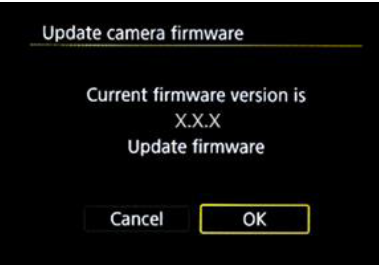
If this screen is not displayed, the firmware file may not have been correctly copied to the card. Please start over from the "Copy the firmware to the card" step on this page.
- The firmware update file name will be displayed, so press the <SET> button
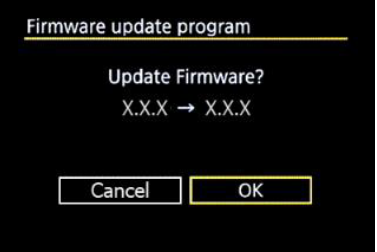
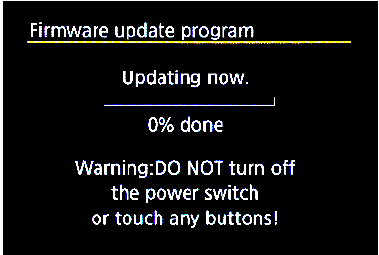
- Check the displayed screen, select <OK> and press the <SET> button. Pressing the <SET> button will start the firmware update
NOTE: Do not turn the camera's power off or operate the buttons, dials, etc., while the update is in progress. Doing so may damage the camera

In the unlikely event that an error occurs during the firmware update, please remove the battery and stop the update procedure. Check the remaining battery level and the firmware on the card, and if there are no problems, start over the procedure from the beginning. If the update procedure cannot be correctly completed, please contact a
Canon Customer Support.
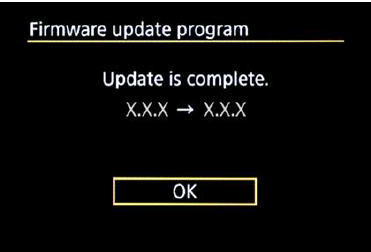
- Check the update completed screen and press the <SET> button. NOTE: Depending on the model, the "Update is complete" screen may not be displayed
This completes the firmware update. Please intialize/format the card before use.
Verifying The Firmware Version
- Turn the camera's power on and set the shooting mode to <P> mode
- Press the <Menu> button to display the menu
- Check <Firmware Ver.X.X.X> is in the <Set-up> tab in the menu
 Use EOS Utility To Update The Camera's Firmware
The method of using EOS Utility to update the firmware is not supported on some camera models. If it is not supported for your camera model, perform the update according to "Use The Card Reader To Update The Camera's Firmware" (above).
Connect the camera to the computer
- Insert the card into the camera and turn the power on
- Format the card. Please see the camera's instruction manual for information on how to format/intialize the card. As this will erase the contents of your memory card, backing up your images/videos to your computer before performing this step is recommended
- Set the shooting mode to <P> mode
- Connect the camera to a computer via a USB cable
Update the firmware
- Start EOS Utility on your computer
- Click <Camera Settings> on the EOS Utility screen
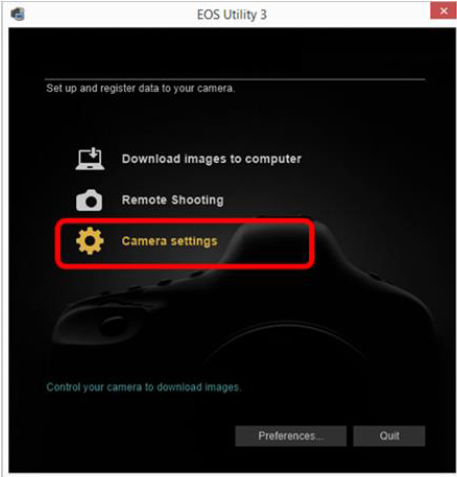
- Click <Firmware update>

- Click <Next>
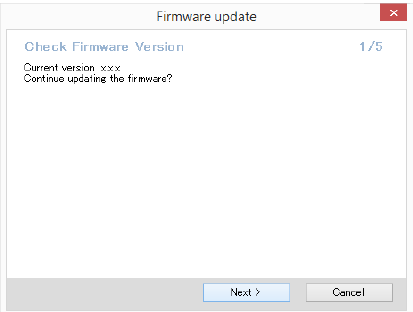
- Click <Next>

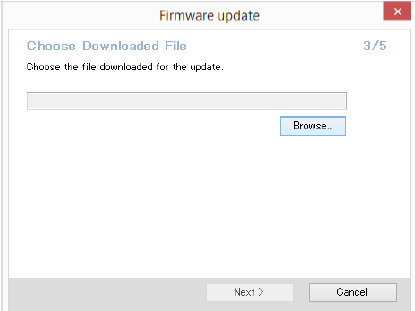
- Click <Browse>, select the file and then click <Next>
- Click <Next>
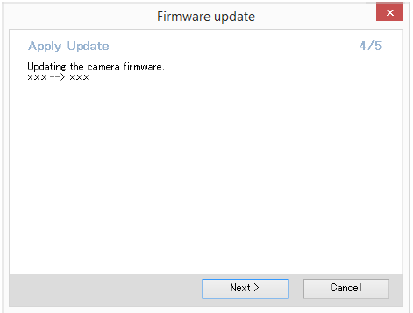
- Click <OK>
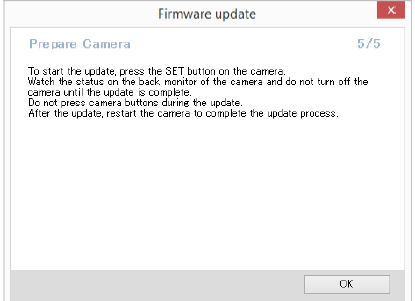
- Check the displayed screen on your camera, select <OK> and press the <SET> button. Pressing the <SET> button will start the firmware update.
Do not turn the camera's power off or operate the buttons, dials, etc., while the update is in progress. Doing so may damage the camera.
In the unlikely event that an error occurs during the firmware update, please remove the battery and stop the update procedure. Check the remaining battery level and the firmware on the card, and if there are any problems, start over the procedure from the beginning. If the update procedure cannot be correctly completed, please contact a
Canon Customer Support.
- Check the update completed screen on your camera and press the <SET> button.
 NOTE: Depending on the model, the "Update is complete" screen may not be displayed.
This completes the firmware update. Please initalize/format the card before use.
Verifying The Firmware Version

- Turn the camera's power on and set the shooting mode to <P> mode
- Press the <Menu> button to display the menu
- Check <Firmware Ver. X.X.X> in the <Set-up> tab in the menu