Loading Envelopes in Rear Tray
You can load envelopes on the rear tray.
The address is automatically rotated and printed according to the envelope's direction by specifying with the printer driver properly.
 Do not use the following envelopes. They could jam in the printer or cause the printer to malfunction.
-
Envelopes with an embossed or treated surface
-
Envelopes with a double flap
-
Envelopes whose gummed flaps are already moistened and adhesive
-
Prepare envelopes:
-
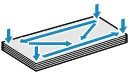
Press down on all four corners and edges of the envelopes to flatten them.
-
If the envelopes are curled, hold the opposite corners and gently twist them in the opposite direction.

-
If the corner of the envelope flap is folded, flatten it.
-
Use a pen to press the leading edge in the inserting direction flat and sharpen the crease.
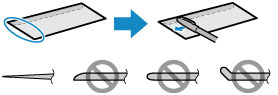
The figures above show a side view of the leading edge of the envelope.
The envelopes may jam in the printer if they are not flat or the edges are not aligned. Make sure that no curl or puff exceeds 0.12 in. (3 mm).
-
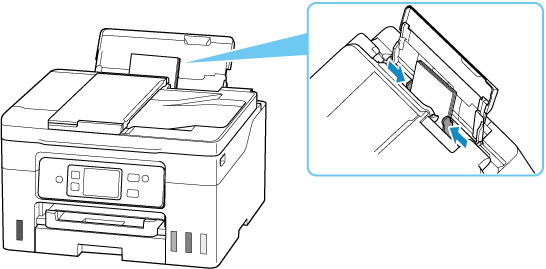
Open the rear tray cover (A) and then pull up the paper support (B).

-
Slide right paper guide (C) to open both paper guides.
-
Load envelopes in portrait orientation WITH THE PRINT SIDE FACING UP.
Up to 10 envelopes can be loaded at once.
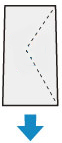
Fold flap of the envelope and load the envelope in portrait orientation with the address side facing up.
After loading the envelopes, the paper setting confirmation screen for the rear tray appears on the touch screen.
-
Move the right paper guide and adjust the guides to both edges of the envelopes.
Do not slide the paper guides too tightly against the envelopes. The envelopes may not be fed properly.
 Do not load envelopes higher than the load limit mark (D).

-
If the page size and media type shown on the touch screen match the size and type of envelopes loaded in the rear tray, select Yes.
If not, select Change to change the settings to match the size and type of the loaded envelopes.

-
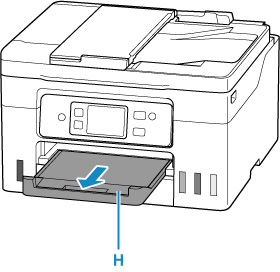
Pull out the paper output tray (E).
To prevent incorrect printing, this printer has a function that detects whether the settings for the paper loaded on the rear tray matches the paper settings. Before printing, make print settings in accordance with the paper settings. When this function is enabled, an error message is displayed if these settings do not match to prevent incorrect printing. When this error message is displayed, check and correct the paper settings.
If your product issue was not resolved after following the steps above, or if you require additional help, please create or log in to your Canon Account to see your technical support options.
Or if you still need help, visit our Canon Community by clicking the button below to get answers:

____________________________________________________________________________________________
