Precautions When Handling Maintenance Cartridges
 Take the following precautions when handling the maintenance cartridge.
-
For safety, keep maintenance cartridge out of the reach of children.
-
If ink is accidentally ingested, contact a physician immediately.
If the displayed message indicates that the maintenance cartridge is nearly full, promptly obtain a new one. If the maintenance cartridge becomes full, an error message is displayed and the printer stops working until it is replaced with a new one.
Do not remove the maintenance cartridge except to replace it. Ink may leak out.
Do not remove a maintenance cartridge during initialization immediately after turning on the printer, during print head cleaning, while ink is being drawn out, or during initialization immediately after replacing the maintenance cartridge.
The maintenance cartridge may become damaged or ink may leak out.
To prevent ink from leaking from a used maintenance cartridge, avoid dropping the cartridge or storing it at an angle. Otherwise, ink may leak and cause stains.
Handle the maintenance cartridge carefully during replacement. The ink may stain clothing.
How to Replace a Maintenance Cartridge
If a message indicates you should replace a maintenance cartridge, check the message details and go to step 6.
-
Select  (Information) on the HOME screen.
-
Select  Maintenance cart. info..
-
Select Replace.
-
Select Yes.
-
Check the displayed message and select OK.
Instructions for the maintenance cartridge replacement procedure appear on the touch screen.
-
Open the box, and the remove plastic bag and the maintenance cartridge.
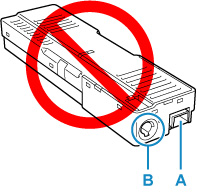
Do not touch the terminal (A) or opening (B) of the maintenance cartridge.
-
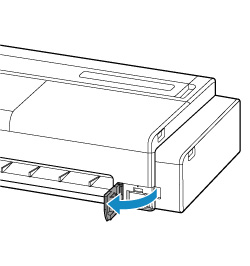
Open the maintenance cover.
-
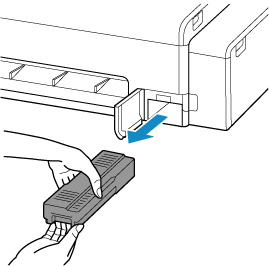
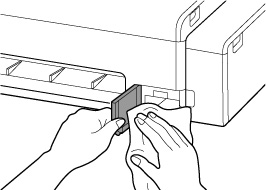
Pull out the maintenance cartridge.
Hold the upper portion of the maintenance cartridge with your hands so that its bottom does not touch the floor or desk.
A used maintenance cartridge is heavy. Always grasp the cartridge firmly and keep the cartridge level during removal. If you drop a used maintenance cartridge or store it at an angle, ink may leak and cause stains.
-
Put used maintenance cartridge in supplied plastic bag and store on flat surface.
Always put the used maintenance cartridge back in the box and store the box on a flat surface.
Be careful not to drop or place the removed maintenance cartridge on a desk or something. Dirt on the bottom may adhere to it or the ink inside may be scattered.
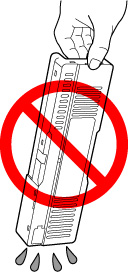
Do not turn the removed maintenance cartridge upside down to prevent leakage of ink.
Put the used one immediately into the plastic bag attached to the new maintenance cartridge and seal the bag by tying the opening tightly to prevent the ink from leaking.

Do not put your hands inside the printer, as ink may adhere to your hands.
-
Wipe away any soiling on the maintenance cover.
When wiping the maintenance cover, support the left side of the cover.
-
Keeping the new maintenance cartridge level, insert it all the way in.
The maintenance cartridge is initialized.
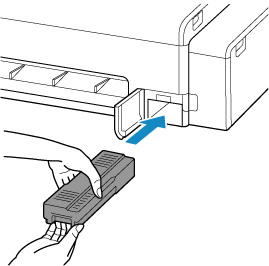
Do not remove the maintenance cartridge during initialization immediately after replacing the maintenance cartridge. The maintenance cartridge may become damaged.
-
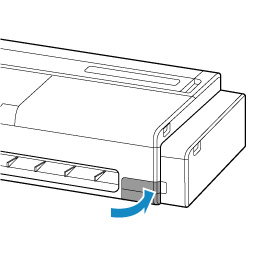
Close the maintenance cover.
If your product issue was not resolved after following the steps above, or if you require additional help, please create or log in to your Canon Account to see your technical support options.
Or if you still need help, visit our Canon Community by clicking the button below to get answers:

____________________________________________________________________________________________
