You can specify the height and width of paper when its size cannot be selected from the Page Size. Such a paper size is called "custom size."
There are two ways of setting a user-defined paper, setting the paper from Size Options... on the Page Setup tab and setting the paper from Custom Size of Page Size.
If you will be using a user-defined paper repeatedly, setting it from Size Options... is convenient because it becomes registered to Page Size and can be selected any time after that.
If you want to use a user-defined paper temporarily, setting it from Custom Size is suitable.
The procedure for specifying a custom size is as follows:
Setting from Paper Size Options
-
Open the printer driver setup window.
-
Click Size Options... on the Page Setup tab
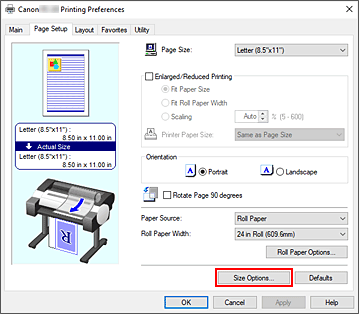
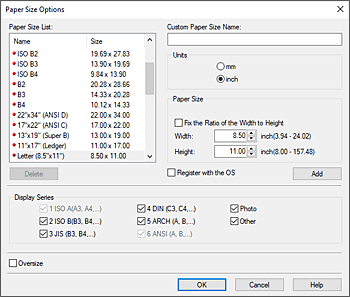
The Paper Size Options dialog box opens.
-
Set Custom Paper Size Name, Units, and Size, and then click Add.
For Size, specify a size or select the paper size to be used from Paper Size List.
To narrow down the paper sizes displayed in Paper Size List, select the Display Series check box.
-
Click OK, then it returns to the Page Setup tab.
The paper size registered by using Custom Paper Size Name is registered to Custom Paper Size of Page Size and can be selected at any time.
Setting from Custom Size
-
Open the printer driver setup window.
-
For Page Size on the Page Setup tab, select Custom Size from the Custom Paper Size list.
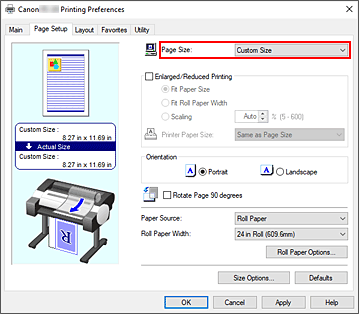
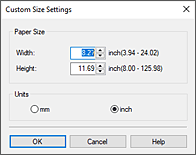
The Custom Size Settings dialog box opens.
-
Enter the Width and Height values of the paper to be used, specify the Units, and then click OK.
-
Click OK on the Page Setup tab.
When you print, the data is printed with the specified paper size.
 If the application software that created the document has a function for specifying height and width values, use the application software to set the values. If the application software does not have such a function or if the document does not print correctly, perform the above procedure from the printer driver to set the values.
 Printing may be disabled depending on the size of the specified user-defined media. Information about printable sizes for user-defined media can be found here.
Any paper size that was set by using Custom Size can no longer be used after the application software is closed.
 If the paper settings in the printer driver differ from the paper information registered on the printer, an error message may appear on the printer's operation panel. You can still print but you may not be able to obtain correct print results.
The maximum configurable size with Custom Size is 3.2m.
If your product issue was not resolved after following the steps above, or if you require additional help, please create or log in to your Canon Account to see your technical support options.
Or if you still need help, visit our Canon Community by clicking the button below to get answers:

____________________________________________________________________________________________
