Clean the print head if lines are missing or if horizontal streaks are present in the printed nozzle check pattern. Cleaning unclogs the nozzles and restores the print head condition. Cleaning the print head consumes ink, so clean the print head only when necessary.
- Make sure the printer is powered on.
- Press the Setup button until 2 appears on the LCD.
- Press the Black button or the Color button.
The printer starts cleaning the print head.
The cleaning will be complete when the ON lamp lights after flashing.
Do not perform any other operations until the printer completes the cleaning of the print head. This takes about 1 to 2 minutes.
- Check the print head condition by printing a nozzle check pattern.
 If the problem is not resolved after cleaning the print head twice, clean the print head deeply.
If print quality does not improve by the standard cleaning of the print head, clean the print head deeply. Cleaning the print head deeply consumes more ink than the standard cleaning of the print head, so clean the print head deeply only when necessary.
- Make sure the printer is powered on.
- Press the Setup button until 3 appears on the LCD.
- Press the Black button or the Color button.
The printer starts cleaning the print head deeply.
The cleaning will be complete when the ON lamp lights after flashing.
Do not perform any other operations until the printer completes the deep cleaning of the print head. This takes about 3 minutes.
- Check the print head condition by printing a nozzle check pattern.
If the problem is not resolved, turn off the power and clean the print head deeply again after 24 hours.
"Replace Ink in Print Head" consumes a great amount of ink.
Frequent "Replace Ink in Print Head" can rapidly consume ink, so perform it only when necessary.
 "Replace Ink in Print Head" when the remaining ink level is not enough may damage the printer.
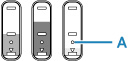
Before executing this process, check the remaining ink level of all colors. If the remaining ink level is below the single dot (A), refill the ink tank of the corresponding color.
When "Replace Ink in Print Head", check the free space of the maintenance cartridge. "Replace Ink in Print Head" consumes a lot of ink, and the consumed ink is discharged to the maintenance cartridge. If the free space is low, replace it with a new maintenance cartridge. If the available capacity of the maintenance cartridge is low, the Alarm lamp flashes and "Replace Ink in Print Head" cannot be performed.
Perform "Replace Ink in Print Head" following the procedure below.
- Make sure the printer is powered on.
- Press the
 (Setup) button.
 (Setup) icon and a number are displayed on LCD.
- Press the (Setup) button repeatedly until "9" appears.
- Press the Color button or Black button.
"Replace Ink in Print Head" starts for all colors.
Do not perform any operations while "Replace Ink in Print Head" is in progress. It takes approximately 6 minutes to complete.

