|
|
How to scan using CaptureOnTouch Lite and Windows
| Article ID: ART181701 |
| |
Date published: 03/20/2023 |
| |
Date last updated: 03/20/2023 |
Description
This article describes how to scan when using CaptureOnTouch Lite.
Solution
- Make sure that the scanner and computer are connected properly.
- Power on the scanner and then load a document.
When you turn ON the scanner, the Power button on the scanner lights and the window shown below opens automatically. If you double-click the [ONTOUCH L] icon, CaptureOnTouch Lite starts up and the main screen opens.

If you double-click the [manual] icon, the User Manual appears

If you close the screen that the [ONTOUCH L] icon is displayed, power the scanner off and then back on again.
An error message may appear when you power off the scanner, but ignore the message.

- The [ONTOUCHLITE] screen may not appear in some operating environments. In such cases, open the [ONTOUCHLITE] drive in Windows Explorer, for example, and start the application directly by double-clicking [ONTOUCHL.exe].
Depending on your operating system, the drive name may not be [ONTOUCHLITE]. Open the drive on which [ONTOUCHL.exe] is located, and start the application directly.
- Depend on your operating system, [CaptureOnTouch Lite] may appear in the [AutoPlay] screen. In such cases, double-click [CaptureOnTouch Lite] to start CaptureOnTouch Lite.
If there is an update for CaptureOnTouch Lite when the computer is connected to the Internet, the software update notice screen appears.

- Click the scan mode panel appropriate for the document to be scanned in [1 Select document].
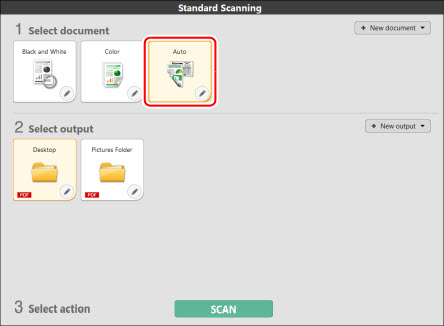
The selected Scan mode panel will be displayed in orange.
- Click the output panel for the scan image application from [2 Select output].
The selected output panel will be displayed in orange.
- Click the [SCAN] button.

The document is scanned. While scanning is in progress, the number of pages scanned is displayed in addition to the scanner settings.
When the scan is finished, the Scanned image preview screen opens.
If you configure scanning conditions that consume a large amount of the computer's memory, scanning may stop because of insufficient memory. If an error message appears due to insufficient memory while scanning is in progress, stop scanning, change the scanning conditions, and then try scanning again.
If scanning continuously, set the next document, and click the [Scan more pages] button start the document scan.

- After confirming the scanned image, click the [Finish] button.

Click the [Cancel] button to discard the scanned image and return to the main window.
- When the output has finished, a popup window will be displayed. If saving the scanned image, a link to open the save destination folder will be displayed.

If you specify an output method other than Print or E-mail attachment, the [Open storage folder] button appears. This button opens the folder where the saved images were saved.
|
