|
|
EOS R3: Multiple Exposures
| Article ID: ART181962 |
| |
Date published: 05/11/2023 |
| |
Date last updated: 08/31/2023 |
Description
Multiple Exposures
Solution
|
Multiple Exposures
As you shoot multiple exposures (2–9), you can see how the images will be merged into a single image.
-
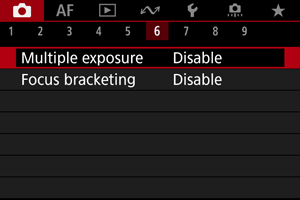
Select [ : Multiple exposure]. : Multiple exposure].
-
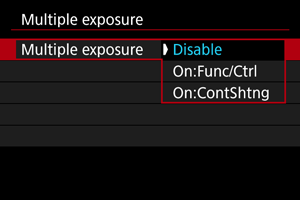
Set [Multiple exposure].
- Select an option, then press
 . .
- To exit shooting multiple exposures, select [Disable].
-
On:Func/Ctrl
Convenient when shooting multiple exposures gradually as you check the results. During continuous shooting, the continuous shooting speed will decrease greatly.
-
On:ContShtng
Used for continuous multiple exposures of moving subjects. Continuous shooting is possible, but the following operations are disabled during shooting: menu screen viewing, image review after capture, image playback, and undo last image ().
Note that the single exposures used for merging are discarded, and only the multiple-exposure image is saved.
-
Set [Multi-expos ctrl].
- Select a merging option, then press .
-
Additive
The exposure of each single image captured is added cumulatively. Based on [No. of exposures], set negative exposure compensation. Follow these basic guidelines to set the exposure compensation amount.
Exposure compensation setting guidelines, by number of exposures
Two exposures: –1 stop, three exposures: –1.5 stops, four exposures: –2 stops
-
Average
Based on the [No. of exposures], negative exposure compensation is set automatically as you shoot multiple exposures. If you shoot multiple exposures of the same scene, the exposure of the subject's background will be automatically controlled to obtain the standard exposure.
-
Bright/Dark
Brightness (or darkness) of the base image and added images is compared at the same position, and bright (or dark) portions are retained. Some overlapping colors may be mixed, depending on the relative brightness (or darkness) of the images.
-
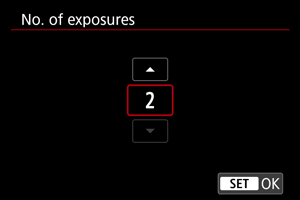
Set [No. of exposures].
- Select the number of exposures, then press .
-
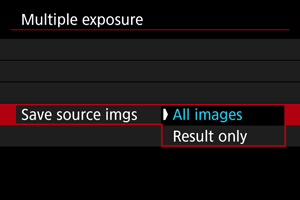
Specify the images to save.
- To save all single exposures and the multiple-exposure image, select [All images] and press .
- To save only the multiple-exposure image, select [Result only] and press .
-
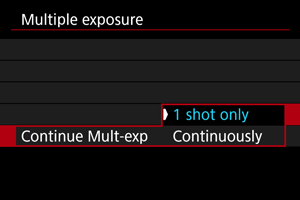
Set [Continue Mult-exp].
- Select an option, then press .
- With [1 shot only], multiple-exposure shooting will be canceled automatically after the shooting ends.
- With [Continuously], multiple-exposure shooting continues until the setting in step 2 is set to [Disable].
-
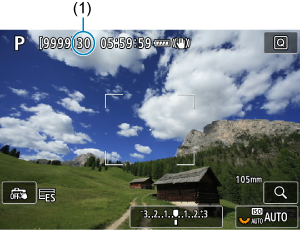
Shoot the first exposure.
- When [On:Func/Ctrl] is set, the captured image will be displayed.
- The [
 ] icon blinks. ] icon blinks.
- The number of remaining exposures is indicated on the screen (1) for reference.
- Pressing the
 button enables you to view the captured image (). button enables you to view the captured image ().
-
Shoot the next exposures.
- Images captured so far are displayed merged. For only image display, press the
 button repeatedly. button repeatedly.
- Multiple-exposure shooting will end when the set number of exposures are taken.
Note
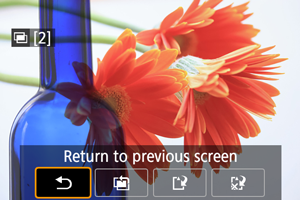
- With [On:Func/Ctrl], you can press the button to view the multiple-exposure image so far or delete the previous single exposure ().
- As shooting information, the multiple-exposure image has information captured for the last shot.
Merging Multiple Exposures with a JPEG Image Recorded on the Card
You can select a JPEG image recorded on the card as the first single exposure. The selected JPEG image will remain intact.
-
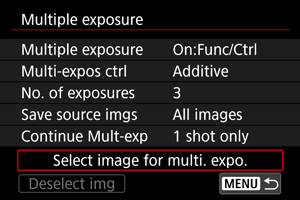
Select [Select image for multi. expo.].
-
Select the first image.
- Turn the
 dial to select the first image, then press . dial to select the first image, then press .
- Select [OK].
- The file number of the selected image will be displayed at the bottom of the screen.
-
Take the picture.
- When you select the first image, the number of remaining exposures as set with [No. of exposures] will decrease by 1.
Images you can select
You can select a JPEG image shot at the same angle of view as the first selected JPEG.
-
Images captured at a full-frame angle of view
Images shot with an RF or EF lens and [:  Cropping/aspect ratio] set to [Full-frame] Cropping/aspect ratio] set to [Full-frame]
-
Images captured at an APS-C angle of view
Images shot with an RF or EF lens and [: Cropping/aspect ratio] set to [1.6x (crop)], or images shot with an EF-S lens
Note
- You can also select a JPEG image used in multiple-exposure shooting.
- Select [Deselect img] to cancel image selection.
- The color space set for the first image also applies to subsequent images.
Checking and Deleting Multiple Exposures During Shooting
To view the multiple-exposure image so far, check exposure, and see how the images are merged, you can press the button before you finish shooting your specified number of exposures (when [On:Func/Ctrl] is set, but not with [On:ContShtng]).
Pressing the  button will display the operations possible during multiple-exposure shooting. button will display the operations possible during multiple-exposure shooting.
Caution
- During multiple-exposure shooting, you can only play back multiple-exposure images.
 FAQ FAQ
-
Are there any restrictions on the image quality?
Multiple exposures are captured as JPEG [ ] images. Even when [: Img type/size] is set to RAW only, these images are captured as JPEG [] images. ] images. Even when [: Img type/size] is set to RAW only, these images are captured as JPEG [] images.
-
Can I merge images recorded on the card?
With [Select image for multi. expo.], you can select the first single exposure from the images recorded on the card (). Note that you cannot merge multiple images already recorded on the card.
-
How are multiple-exposure files numbered?
With the camera set to save all images, multiple-exposure image files are named with the next number after the number of the last single exposure used to create them.
-
Will auto power off take effect during multiple-exposure shooting?
During multiple-exposure shooting, auto power off will not take effect. Note that before you start multiple-exposure shooting, auto power off automatically takes effect at the time set in the [Auto power off] option of [ : ], which will cancel multiple-exposure shooting. : ], which will cancel multiple-exposure shooting.
|
SIMS Doc Id
1677016413460673292
|