|
|
EOS R3: Using Eye Control
| Article ID: ART182011 |
| |
Date published: 05/11/2023 |
| |
Date last updated: 08/31/2023 |
Description
Using Eye Control
Solution
|
Using Eye Control
You can control focusing by looking at AF points to select them in viewfinder shooting (eye control).
The process of registering characteristics of your line of sight for accurate detection of eye movement by the camera in viewfinder shooting is called calibration. Calibration enables higher eye control accuracy.
Performing Calibration
After adjusting the viewfinder (), perform calibration under the same conditions as when you will shoot (such as with or without glasses or contact lenses).
During calibration, keep your eye near the viewfinder.
-
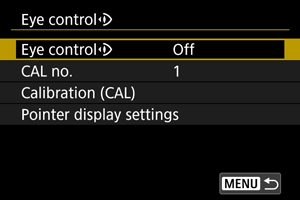
Select [ : Eye control : Eye control ]. ].
-
Select [Calibration (CAL)].
- Calibration results (calibration data) are saved to the current [CAL no.] number.
-
Select [Start].
-
Look through the viewfinder.
- Holding the camera horizontally, look through the viewfinder so that the four corners of the screen appear evenly spaced.
- Press the
 button. button.
-
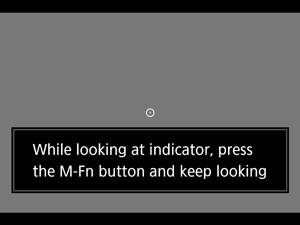
Start calibration.
- Look at the indicator displayed and press the button.
- Keep looking at the indicator without blinking until it disappears.
- This process is repeated for indicators at five positions (center, right, left, top, and bottom).
-
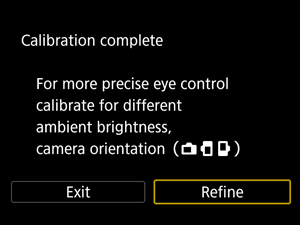
Perform calibration for vertical shooting.
- For higher eye control accuracy, select [Refine] and perform calibration for vertical shooting.
- Holding the camera vertically, look through the viewfinder so that the four corners of the screen appear evenly spaced, then repeat step 5.
- If you will also shoot vertically with the camera grip facing the other direction, perform calibration while holding the camera that way.
- To finish calibration after performing calibration only for horizontal shooting, go to step 7.
-
Exit calibration.
- Select [Exit]. Calibration results (calibration data) are saved to the calibration number shown in step 2.
- After calibration, look through the viewfinder and make sure the pointer moves in response. If the pointer does not seem to follow your gaze closely, perform calibration again.
Adding calibration data
To register calibration data for other users or eyewear conditions, select an available number to assign the data to from the numbers labeled with [ ] on the [CAL no.] screen, then perform calibration. ] on the [CAL no.] screen, then perform calibration.
Using Eye Control for AF
Caution
- Always use eye control under the same eyewear conditions as when you performed calibration (such as with or without glasses or contact lenses).
Menu settings
-
Select [: Eye control].
-
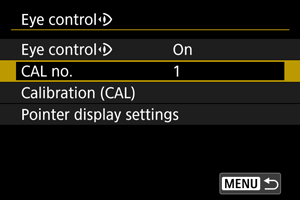
Select [Eye control].
-
Select [On].
- You can enable switching between [Eye control] [Enable] and [Disable] from the Quick Control screen by customizing the Quick Control screen ().
-
Select [CAL no.].
- Select a calibration number matching your eyewear conditions (such as with or without glasses).
-
Select calibration data to use.
- Press
 . .
Operations in viewfinder shooting
-
Look at the subject.
- A pointer (1) is displayed when you look through the viewfinder.
- With [
 : Subject tracking] set to [On], a tracking frame [ : Subject tracking] set to [On], a tracking frame [ ] (2) is also displayed when subjects are detected. ] (2) is also displayed when subjects are detected.
- Look at the position where you wish to focus. To focus at the position of the tracking frame, look at the tracking frame.
- The pointer may stop moving unless the camera can follow your eye movement. If so, hold the camera away from your face for a moment, then look through the viewfinder again so that the four corners of the screen appear evenly spaced.
-
Confirm the subject to start focusing.
Caution
- If the AF point does not move to your specified position after you confirm the subject, hold the camera away from your face, then look through the viewfinder again, or perform calibration again.
Using eye control to display the focus guide
By setting [: Focus guide] to [On], you can use eye control to display the focus guide for assistance when focusing manually.
-
Look at the subject.
- Look at the subject to focus on.
-
Press the shutter button halfway.
- The focus guide (1) is displayed where you are looking.
- For details on using the focus guide to focus, see Focus Guide.
Note
- With [: Subject tracking] set to [On], a tracking frame [] is also displayed when subjects are detected.
General eye control precautions
Enhancing eye control accuracy
The camera can learn about eye characteristics from the calibration data it collects.
If eye control seems inaccurate
- Eye control may be less accurate if your eye is off-center, relative to the viewfinder. Adjust how you are holding the camera to your face, so that the four corners of the screen appear evenly spaced.
- Eye control may be less accurate if you point the camera downward during calibration. Hold the camera straight when performing calibration.
Configuring Pointer Display
You can configure pointer display, including whether the pointer is visible or not.
-
Pointer display
Pointer visibility can be set to [On], [Shtg standby], or [Off].
- Select [Shtg standby] to keep the pointer visible from when you look through the viewfinder until the moment you confirm the subject to focus on using eye control.
- The pointer may not always be displayed, depending on the state of the camera.
- In [
 ] focus mode, setting [: Focus guide] to [On] makes the pointer visible. ] focus mode, setting [: Focus guide] to [On] makes the pointer visible.
-
Sensitivity
Sensitivity of the pointer in response to eye movement is adjustable.
- Set toward the positive end to make the pointer responsive even to subtle eye movement.
- Set toward the negative end to make the pointer less responsive.
-
Color
Choose [Orange], [Purple], or [White] as the pointer color.
-
Display size
Choose [Standard] or [Small] as the pointer display size.
-
Display format
Choose [ ] or [ ] or [ ] as the style of pointer displayed. ] as the style of pointer displayed.
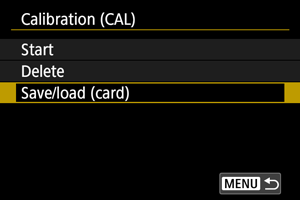
Managing Calibration Data
Saving and loading calibration data
Registered calibration data can be saved to a card. You can also load calibration data from a card to use it.
-
Select [Calibration (CAL)].
-
Select [Save/load (card)].
-
Select [Save to card].
- Select [Save to card] to save all calibration data on the camera to the card.
- Select [Load from card] to overwrite calibration data on the camera with calibration data from the card.
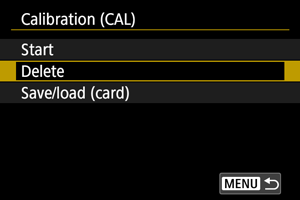
Deleting calibration data
Eye control is less accurate if the same calibration number is used for calibration under different eyewear conditions (such as with or without glasses or contact lenses) or by multiple users. In this case, delete the calibration data and perform calibration again.
-
Select [Calibration (CAL)].
-
Select [Delete].
-
Delete the calibration data.
- Select the data to delete and press .
- To delete all calibration data, select [Delete all] and press .
- After you select [OK] on the confirmation screen, the data is deleted.
|
SIMS Doc Id
1677016412745238511
|