|
|
EOS R3: Selecting the AF Area
| Article ID: ART182096 |
| |
Date published: 05/11/2023 |
| |
Date last updated: 08/31/2023 |
Description
Selecting the AF Area
Solution
|
Selecting the AF Area
AF Area
This section describes AF area operation with [ : Subject tracking] set to [Off]. : Subject tracking] set to [Off].
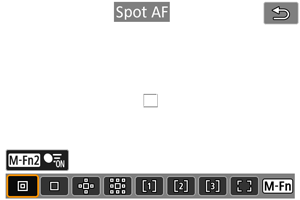
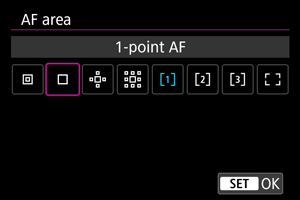
 : Spot AF : Spot AF
The camera focuses in a narrower area than 1-point AF.
 : 1-point AF : 1-point AF
The camera focuses using a single AF point [].
 : Expand AF area: : Expand AF area:
Focuses using one AF point [] and the AF area outlined here in blue. Effective for moving subjects, which are difficult to track with 1-point AF.
Focusing on your preferred subject is easier than with Flexible Zone AF.
When Servo AF is used, first you will focus using an AF point [].
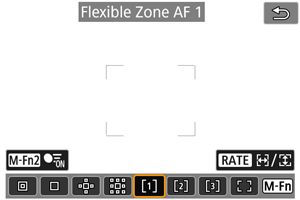
 : Flexible Zone AF 1 (default) : Flexible Zone AF 1 (default)
With Flexible Zone AF 1, you can freely set the size of the Zone AF frame [ ] (). ] ().
Uses auto selection AF in Zone AF frames to cover a larger area than Expand AF area, which makes focusing easier than with 1-point AF/Expand AF area and effective for moving subjects.
By default, a square Zone AF frame is set.
Focusing areas are determined not only based on the nearest subject but also based on a variety of other conditions such as faces (of people or animals), vehicles, subject motion, and subject distance.
Pressing the shutter button halfway displays [] over AF points in focus.
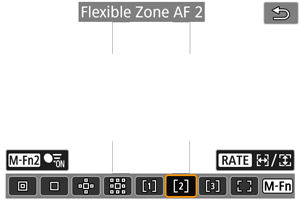
 : Flexible Zone AF 2 : Flexible Zone AF 2
With Flexible Zone AF 2, you can freely set the size of the Zone AF frame [] ().
Uses auto selection AF in Zone AF frames to cover a larger area than Expand AF area, which makes focusing easier than with 1-point AF/Expand AF area and effective for moving subjects.
By default, a vertical rectangular Zone AF frame is set.
Focusing areas are determined not only based on the nearest subject but also based on a variety of other conditions such as faces (of people or animals), vehicles, subject motion, and subject distance.
Pressing the shutter button halfway displays [] over AF points in focus.
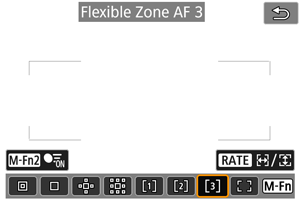
 : Flexible Zone AF 3 : Flexible Zone AF 3
With Flexible Zone AF 3, you can freely set the size of the Zone AF frame [] ().
Uses auto selection AF in Zone AF frames to cover a larger area than Expand AF area, which makes focusing easier than with 1-point AF/Expand AF area and effective for moving subjects.
By default, a horizontal rectangular Zone AF frame is set.
Focusing areas are determined not only based on the nearest subject but also based on a variety of other conditions such as faces (of people or animals), vehicles, subject motion, and subject distance.
Pressing the shutter button halfway displays [] over AF points in focus.
 : Whole area AF : Whole area AF
Uses auto selection AF in a whole-area AF frame to cover a larger area than Flexible Zone AF, which makes focusing easier than with 1-point AF/Expand AF area/Flexible Zone AF and effective for moving subjects.
Focusing areas are determined not only based on the nearest subject but also based on a variety of other conditions such as faces (of people or animals), vehicles, subject motion, and subject distance.
Pressing the shutter button halfway displays [] over AF points in focus.
Selecting the AF Area
You can select the AF area to suit the shooting conditions or subject.
If you prefer to focus manually, see Manual Focus.
-
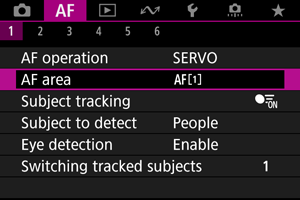
Select [: AF area].
-
Select the AF area.
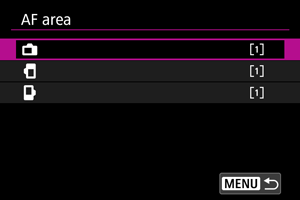
- The screen above is displayed when [: Orientation linked AF point] () is set to [Separate AF pts: Area+pt]. Set separate AF areas after choosing vertical and horizontal orientations.
Note
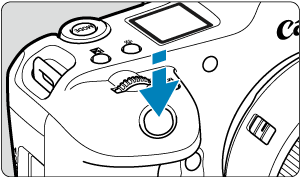
- To set the AF area, you can also press the
 button and then the button and then the  button. button.
- The following descriptions apply to the camera with AF operation set to [Servo AF] (). Once a subject is in focus with [One-Shot AF] (), the AF point turns green.
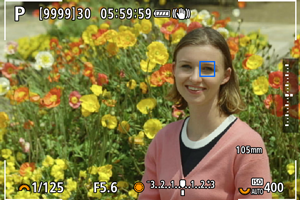
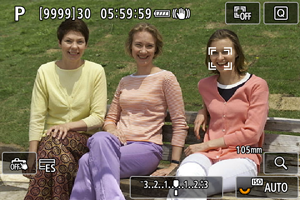
Subject Tracking
Among the subjects detected, a tracking frame [] is displayed over the main subject.
If the subject moves, the tracking frame [] also moves to track it.
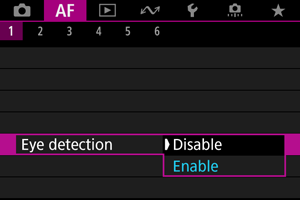
You can set [: Eye detection] to [Enable] to shoot with the subject's eyes in focus ().
-
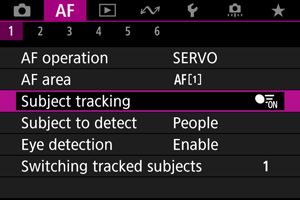
Select [: Subject tracking].
-
Select an option.
Manually selecting a subject for focus
-
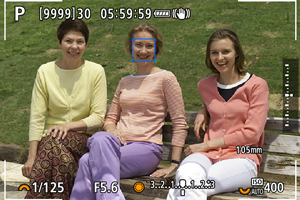
Check the tracking frame.
- A tracking frame [] appears over detected subjects.
- Unless the tracking frame [] overlaps an AF point, it is displayed in gray.
- Once the tracked subject is behind or inside an AF point, the tracking frame turns white (distinguishing it as an active frame), enabling selection as the main subject.
- Tracking frames are also white outside of an AF point as long as part of a subject is detected in the AF point and part of the subject (such as eyes, face, or head) lies within the range of Whole area AF.
- Gray display of tracking frames [] does not apply in movie recording.
-
Focus and shoot/record.
-
Once you press the shutter button halfway and the subject is in focus, the AF point turns blue.
An orange AF point indicates that the camera could not focus on subjects.
-
Subjects are tracked across the entire screen as you press the shutter button halfway or completely.
Caution
- Tapping the screen to focus will focus with [One-Shot AF], regardless of the AF operation setting.
- Faces cannot be detected when subjects are greatly out of focus. Focus manually () to bring the subject's face into position for detection, then continue with AF.
- AF may not detect subjects or people's faces at the edges of the screen. Before shooting, recompose the shot to center or roughly center the subject or AF point.
Subject to Detect
You can specify conditions for automatic selection of the main subject to track.
-
People
Prioritizes the faces or heads of people as the main subjects to track.
When a person's face or head cannot be detected, the camera attempts to detect and track their torso. If their torso cannot be detected, the camera may track other parts of their body.
-
Animals
Detects animals (dogs, cats, or birds) and people and prioritizes detection results for animals as the main subjects to track.
For animals, the camera attempts to detect faces or bodies, and a tracking frame is shown over any face detected.
When an animal's face or entire body cannot be detected, the camera may track part of their body.
-
Vehicles
Detects two- or four-wheeled motorsports vehicles and people and prioritizes detection results for vehicles as the main subjects to track.
For vehicles, the camera attempts to detect key details or the entire vehicle, and a tracking frame is shown over any of these details detected.
If key details or the entire vehicle cannot be detected, the camera may track other parts of the vehicle.
Press the  button to enable or disable Spot detection for key details of vehicles. button to enable or disable Spot detection for key details of vehicles.
-
None
The camera determines the main subject automatically from how you compose shots, without detecting subjects.
Tracking frames are not displayed.
Switching Tracked Subjects
You can specify how easily the camera switches AF points to track subjects.
-
Initial priority
Tracks the subject initially determined for AF, to the extent possible.
-
On subject
Tracks the subject initially determined for AF, to the extent possible. Switches to other subjects if the camera can no longer determine if the tracked subject is the main subject.
-
Switch subject
Switches to track other subjects in response to shooting conditions.
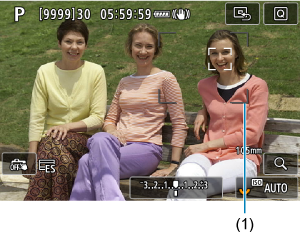
Manually Setting AF Points or Zone AF Frames
You can manually set the AF point or Zone AF frame. Here, Flexible Zone AF 1 screens are used as an example.
-
Check the AF point.
- The AF point (1) will appear.
- With Expand AF area: or Expand AF area: Around, adjacent AF points are also displayed.
- With Flexible Zone AF, the specified Zone AF frame is displayed.
-
Move the AF point.
- Press the button, use
 to move the AF point into position for focusing, then press to move the AF point into position for focusing, then press  (but note that with some lenses, it may not move to the edge of the screen). (but note that with some lenses, it may not move to the edge of the screen).
- To center the AF point while using , press straight in.
- You can also focus by tapping a position on the screen.
- To center the AF point or Zone AF frame, tap [
 ] or press straight in. ] or press straight in.
- You can resize Zone AF frames used for Flexible Zone AF by pressing the
 button. Adjust the horizontal size with the button. Adjust the horizontal size with the  dial and vertical size with the dial and vertical size with the  dial, then press . To restore the default Zone AF frame size, press the button. dial, then press . To restore the default Zone AF frame size, press the button.
-
Focus and take the picture.
- Aim the AF point over the subject and press the shutter button halfway.
- When focus is achieved, the AF point turns blue.
- If focus is not achieved, the AF point will turn orange.
Caution
- The camera will keep moving the AF point [] to track subjects when set to Flexible Zone AF and Servo AF, but under some shooting conditions (such as when subjects are small), it may not be possible to track the subject.
- Focusing may be difficult when using a peripheral AF point. In this case, select an AF point in the center.
- Tapping the screen to focus will focus with [One-Shot AF], regardless of the AF operation setting.
Note
- You can set AF areas and AF points when [: Orientation linked AF point] is set to [Separate AF pts: Area+pt] ().
Magnified View
To check the focus, you can magnify display by approx. 5× or 10× by pressing the  button (or tapping []). button (or tapping []).
- Magnification is centered on the AF point for [Spot AF], [1-point AF], [Expand AF area: ], and [Expand AF area: Around], or on the Zone AF frame for Flexible Zone AF.
- Autofocusing is performed in magnified view if you press the shutter button halfway.
- When set to Servo AF, pressing the shutter button halfway in magnified view reverts to the normal view for focusing.
- Magnification is centered on the tracking frame when [: Subject tracking] is set to [On] and the tracking frame [] is white (as an active frame), or when you are tracking with the
 button (). button ().
Caution
- If focusing is difficult in the magnified view, return to the normal view and perform AF.
- If you perform AF in the normal view and then use the magnified view, accurate focus may not be achieved.
- AF speed differs between the normal view and magnified view.
- Preview AF and Movie Servo AF are not available in magnified view.
- With the magnified view, achieving focus becomes more difficult due to camera shake. Using a tripod is recommended.
AF Shooting Tips
- Even when focus is achieved, pressing the shutter button halfway will focus again.
- Image brightness may change before and after autofocusing.
- Depending on the subject and shooting conditions, it may take longer to focus, or the continuous shooting speed may decrease.
- If the light source changes as you shoot, the screen may flicker, and focusing may be difficult. In this case, restart the camera and resume shooting with AF under the light source you will use.
- If focusing is not possible with AF, focus manually ().
- For subjects at the edge of the screen that are slightly out of focus, try centering the subject (or AF point, or Zone AF frame) to bring them into focus, then recompose the shot before shooting.
- With certain lenses, it may take more time to achieve focus with autofocus, or accurate focusing may not be achieved.
Shooting Conditions That Make Focusing Difficult
- Subject with low-contrast such as the blue sky, solid-color flat surfaces or when highlight or shadow details are clipped.
- Subjects in low light.
- Stripes and other patterns where there is contrast only in the horizontal direction.
- Subjects with repetitive patterns (Example: Skyscraper windows, computer keyboards, etc.).
- Fine lines and subject outlines.
- Under light sources with constantly changing brightness, colors, or patterns.
- Night scenes or points of light.
- The image flickers under fluorescent or LED lighting.
- Extremely small subjects.
- Subjects at the edge of the screen.
- Strongly backlit or reflective subjects (Example: Car with a highly reflective surfaces, etc.).
- Near and distant subjects covered by an AF point (Example: Animal in a cage, etc.).
- Subjects that keep moving within the AF point and will not stay still due to camera shake or subject blur.
- Performing AF when the subject is very far out of focus.
- Soft focus effect is applied with a soft focus lens.
- A special effect filter is used.
- Noise (dots of light, banding, etc.) appears on the screen during AF.
AF Range
The available autofocus range varies depending on the lens, aspect ratio, and image quality used, and whether you are shooting 4K movies or using features such as Movie cropping or Movie digital IS.
|
SIMS Doc Id
1677016414310434882
|