Two-Sided Copying
You can copy two original pages onto both sides of a single sheet of paper.
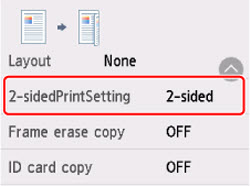
Select Settings in the copy standby screen to display the print setting screen. Select 2-sidedPrintSetting for 2-sided and select OK.
Specify the place to load originals or copy settings according to the two-sided copying method.
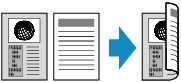
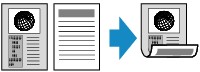
Single-sided to Two-sided
2-sidedPrintSetting: 2-sided
When you select Advanced after selecting 2-sided for 2-sidedPrintSetting, you can select the orientation and the stapling side of the paper. Also, you can select whether to display the preview screen when you load the original on the platen.
-
When you select Orientation: Portrait and Output: Long side bind:
-
When you select Orientation: Portrait and Output: Short side bind:
-
When you select Orientation: Landscape and Output: Long side bind:

-
When you select Orientation: Landscape and Output: Short side bind:

When Loading the Original on the platen:
-
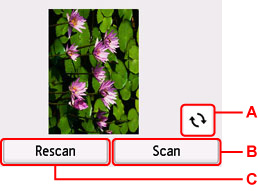
Before scanning:
When you select 2-sided for 2-sidedPrintSetting and the preview function is activated, the printer starts pre-scanning before scanning the original. When pre-scanning is finished, the preview screen appears on the touch screen.
-
Select to rotate the original by 180 degrees.
-
Select to start scanning the original.
-
Select to rescan the original.
-
After scanning:
The confirmation screen appears after scanning each sheet of original.

-
Select to start scanning the original.
Remove the sheet of original from the platen after scanning and load the next sheet on the platen and select Scan.
-
Select to start copying the original already scanned.
If your product issue was not resolved after following the steps above, or if you require additional help, please create or log in to your Canon Account to see your technical support options.
Or if you still need help, visit our Canon Community by clicking the button below to get answers:

____________________________________________________________________________________________
