|
|
EOS R100: Time-Lapse Movies
| Article ID: ART183749 |
| |
Date published: 09/11/2023 |
| |
Date last updated: 09/28/2023 |
Description
Time-Lapse Movies
Solution
|
Time-Lapse Movies
-
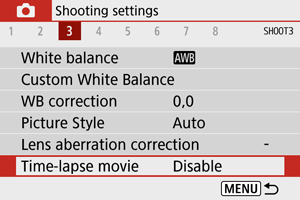
Select [ : Time-lapse movie]. : Time-lapse movie].
-
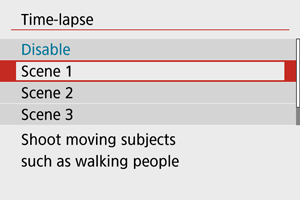
Select [Time-lapse].
-
Select a scene.
- Select a scene to suit the shooting situation.
- For greater freedom when setting the shooting interval and number of shots manually, select [Custom].
-
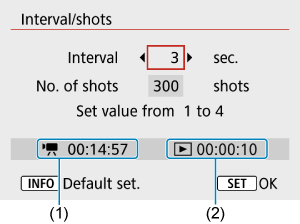
Set the shooting interval.
- Select [Interval/shots].
- Select [Interval] (sec.). Use the
  keys to set a value, then press the keys to set a value, then press the  button. button.
- Refer to [
 : Time required] (1) and [ : Time required] (1) and [ : Playback time] (2) as you set it. : Playback time] (2) as you set it.
When [Custom] is set
- Select [Interval] (min.:sec.).
- Press the button to display
 . .
- Use the
  keys to set a value, then press the button. (Returns to keys to set a value, then press the button. (Returns to  .) .)
- Select [OK] to register the setting.
-
Set the number of shots.
- Select [No. of shots]. Use the keys to set a value, then press the button.
- Refer to [: Time required] and [: Playback time] as you set the number.
When [Custom] is set
- Select the digit.
- Press the button to display .
- Use the keys to set a value, then press the button. (Returns to .)
- Make sure [: Playback time] is not displayed in red.
- Select [OK] to register the setting.
Caution
- [Playback time] is displayed in red if the card does not have enough free space for your specified number of shots. Although the camera can continue recording, the recording will stop when the card becomes full.
- [Playback time] is displayed in red if the [No. of shots] setting results in a file size exceeding 4 GB for a card not formatted in exFAT (). If you keep recording in this condition and the movie file size reaches 4 GB, the time-lapse movie recording will stop.
Note
- With [Scene *], available intervals and numbers of shots are restricted, to suit the type of scene.
- For details on cards that can record time-lapse movies, see Card performance requirements (movie recording) [write/read speed].
- If the number of shots is set to 3600, the time-lapse movie will be approx. 2 min. in NTSC and approx. 2 min. 24 sec. in PAL.
-
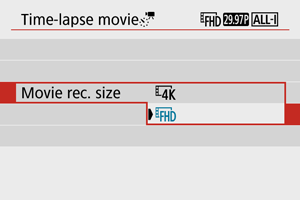
Select the desired movie recording size.
-
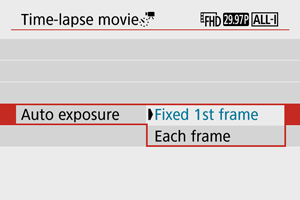
Set [Auto exposure].
-
Fixed 1st frame
When taking the first shot, metering is performed to set the exposure automatically to match the brightness. The exposure setting for the first shot will be applied to subsequent shots. Other shooting-related settings for the first shot will also be applied for subsequent shots.
-
Each frame
Metering is also performed for each subsequent shot to set the exposure automatically to match the brightness. Note that any functions such as Picture Style and white balance that are set to [Auto] will be set automatically for each subsequent shot.
Caution
- Significant changes in brightness between shots may prevent the camera from shooting at the specified interval when [Interval] is set to 3 sec. or less and [Auto exposure] is set to [Each frame].
- With [Auto exposure] set to [Each frame], the ISO speed, shutter speed, and aperture value may not be recorded in the time-lapse movie Exif information in some shooting modes.
-
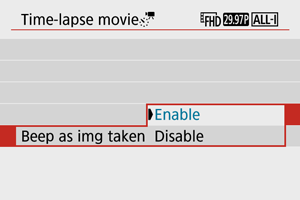
Set [Screen auto off].
-
Disable
Even during time-lapse movie recording, the image will be displayed. (The screen turns off only at the time of shooting.) Note that the screen will turn off when approx. 30 min. elapse after the shooting started.
-
Enable
Note that the screen will turn off when approx. 10 sec. elapse after the shooting started.
Note
- During time-lapse movie recording, you can press the
 button to turn on/off the screen. button to turn on/off the screen.
-
Set the beeper.
- Select [Beep as img taken].
- Set to [Disable] to prevent the camera from beeping for each shot.
-
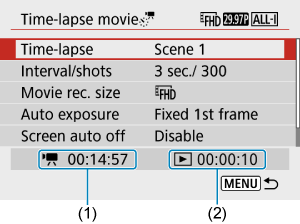
Check the settings.
(1) Time required
Indicates the time required to shoot the set number of shots with the set interval. If it exceeds 24 hours, “*** days” will be displayed.
(2) Playback time
Indicates the movie recording time (time required to play back the movie) when creating the time-lapse movie in 4K movie or Full HD movie from the still photos taken with the set intervals.
-
Close the menu.
- Press the
 button to turn off the menu screen. button to turn off the menu screen.
-
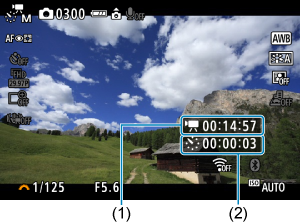
Record the time-lapse movie.
- Press the button and check again the “Time required (1)” and “Interval (2)” displayed on the screen.
- Press the movie shooting button to start time-lapse movie recording.
- AF will not work during time-lapse movie recording.
- “
 REC” is displayed in the upper right of the screen as the time-lapse movie is recorded. REC” is displayed in the upper right of the screen as the time-lapse movie is recorded.
- When the set number of shots are taken, the time-lapse movie recording ends.
- To cancel recording time-lapse movies, set [Time-lapse] to [Disable].
Note
- Using a tripod is recommended.
- Taking test shots in advance is recommended.
- The movie's field of view coverage for both the 4K and Full HD time-lapse movie recording is approx. 100%.
- To cancel time-lapse movie recording in progress, press the movie shooting button. The time-lapse movie shot so far will be recorded on the card.
- If the time required for recording is more than 24 hours but not more than 48 hours, “2 days” will be indicated. If three or more days are required, the number of days will be indicated in 24-hour increments.
- Even if the time-lapse movie's playback time is less than 1 sec., a movie file will still be created. In this case, “00'00"” is indicated in [Playback time].
- If the recording time is long, using the household power outlet accessories (sold separately) is recommended.
- YCbCr 4:2:0 (8-bit) color sampling and the BT.709 color space are used for 4K/Full HD time-lapse movies.
Approx. Time Available for Recording Time-Lapse Movies
For guidelines on how long you can record time-lapse movies (until the battery runs out), see Available operating time.
|
SIMS Doc Id
1691426882152709621
|