Select an option below for more information.
+
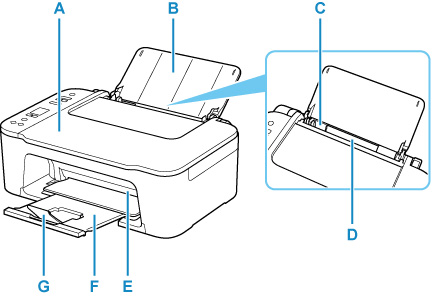
Front View
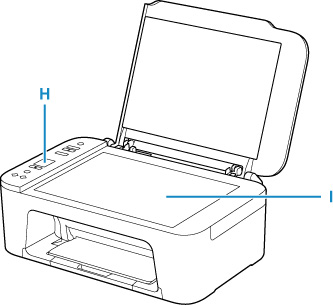
A: Document Cover
Open to load an original document or photo on the platen (scanner glass) .
B: Paper Support
Open to load paper in the rear tray .
C: Paper Guide
Align with the left side of the paper stack.
D: Rear Tray
Load paper here Two or more sheets of the same size and type of paper can be loaded at the same time, and fed automatically one sheet at a time.
E: Cover
Open to replace the ink cartridges or remove jammed paper inside the printer .
F: Paper Output Tray
Printed paper is ejected. Pull it out before printing.
G: Output Tray Extension
Extend to support ejected paper.
H: Operation Panel
Use to change the settings of the printer or to operate it.
I: Platen (Scanner Glass)
Load an original photo or document here.
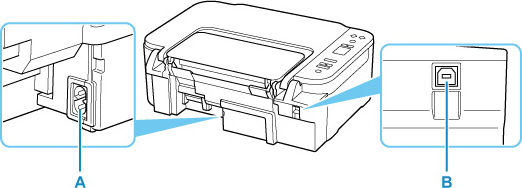
+ Rear View
A: Power Cord Connector
Plug in the supplied power cord.
B: USB Port
Plug in a USB cable to connect the printer with a computer.
Don't touch the metal casing.
Don't plug in or unplug the USB cable while the printer is printing or scanning with the computer. This can cause trouble.
+ Operation Panel
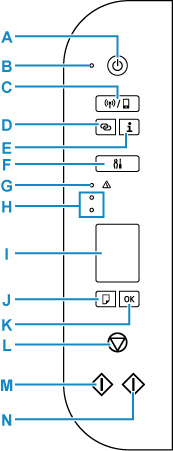
A: ON button
Turns the power on or off. Before turning on the power, make sure that the document cover is closed.
B: ON lamp
Lights after flashing when the power is turned on.
C: Wireless select button
Switch between Wi-Fi and Wireless Direct, or enable / disable them.
Each time you press the Wireless select
D: Wireless connect button
Start the Wi-Fi setup.
E: Information button
Starts printing network settings information.
F: Setup button
Select a menu to perform printer maintenance and to change printer settings. Pressing this button repeatedly switches the segment display on the LCD .
G: Alarm lamp
Lights or flashes when an error occurs.
H: Ink lamps
Light or flash when ink runs out, etc.
The upper lamp indicates the black FINE cartridge status, the lower lamp the color FINE cartridge status.
I: LCD (Liquid Crystal Display)
Displays the number of copies, maintenance code, error code or various icons
J: Paper Select button
Select the paper size of the printer .
K: OK button
Finalizes the selection of paper size setting. This button is also used to resolve an error.
L: Stop button
Cancels operations. You can press this button to cancel a print, copy, or scan job in progress.
M: Black button
Starts black & white copying. You can also press this button to finalize your selection for the setting item or to resolve an error.
N: Color button
Starts color copying. You can also press this button to finalize your selection for the setting item or to resolve an error.
* In the software applications or manuals, the Color Black
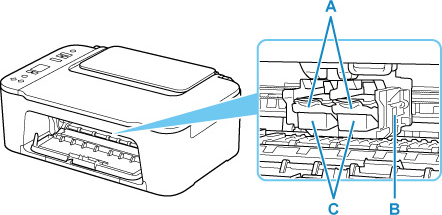
+ Inside View
A: Ink cartridge lock lever
Secures the installed ink cartridge .
B: Ink Cartridge Holder
Install the ink cartridge .
The color ink cartridge should be installed into the left slot and the black ink cartridge should be installed into the right slot.
C: Ink
Cartridge
A replaceable cartridge that integrates print head and ink tank .
Learn how to replace an ink cartridge
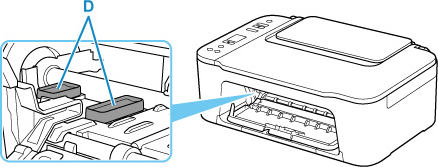
The area around the parts D may be splattered with ink. This does not affect the performance of the printer .
Don't touch the parts (D) . The printer may not print properly if you touch them.
If your product issue was not resolved after following the steps above, or if you require additional help, please create or log in to your Canon Account