
Replacing the Cutter Blade
Compatible cutter blade
For details on compatible cutter blade, see "Cutter Blade."
Selecting Menu for cutter blade Replacement
-
Flick Home screen and tap Maintenance.
The Maintenance screen appears.
-
Tap Replace cutter blade unit.
A confirmation message appears.
-
Tap Yes.
The Carriage moves and after it stops moving, instructions appear on the touch screen.
 Note
Note-
If you do not take action within 2 minutes, cutter blade replacement is canceled. In this case, repeat the procedure.
-
Replacing cutter blade
-
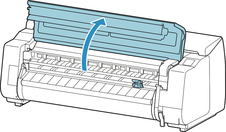
Open top cover.
The cutter blade replacement procedure appears on the touch screen.
-
If cutter blade is dirty, use damp cloth that you have wrung out completely to wipe it clean.
 Important
-
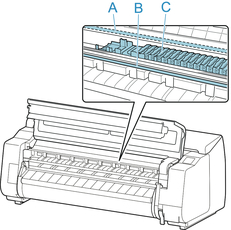
Never touch the linear scale (A), carriage shaft (B), or ink tube stabilizer (C). Touching may damage them.
-
-
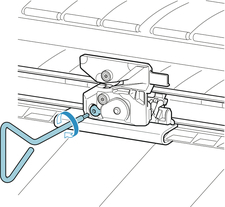
Turn hex screw with hex wrench until loose.

-
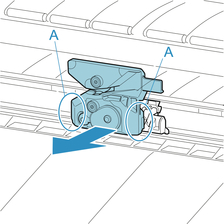
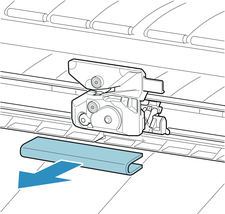
Remove cutter blade while holding A.
 Caution
-
Never touch any part other than A. This may stain your hands or cause injury. Additionally, this may damage the printer.
-
Do not disassemble the cutter blade. Touching the blade may cause injury.
Note-
Dispose of the used cutter blade in accordance with local regulations.
-
-
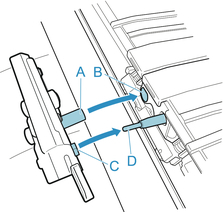
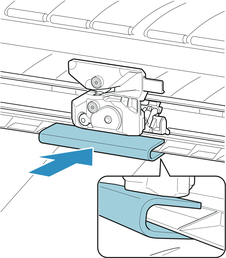
Install new cutter blade while aligning A to B and C to D.
-
Install while aligning fixing part included with replacement cutter blade with center of cutter blade.
-
Turn hex screw until securely fixed.
 Important
-
After the cutter blade is secured, check that the cutter blade does not come off. If the cutter blade comes off, this may damage the printer.
-
-
Remove fixing part.
 Important
-
Always remove the fixing part. Operating with the part installed may damage the printer.
-
-
Close top cover.

-
A confirmation message will appear.
Tap Yes.
