After installing these items, connect a USB cable to the back of the printer and into a USB port on your computer.
Launch the IJ Network Tool on your computer (Look in Finder, then select Applications -> Canon Utilities > IJ Network Tool).
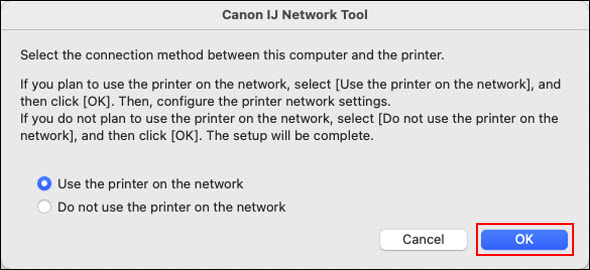
Select Use the printer on the network, then select OK.
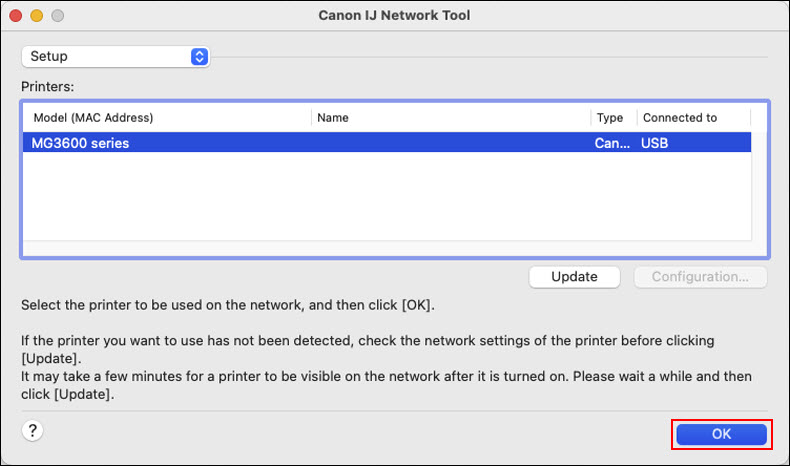
Select your printer, then select OK. If the tab at the upper left says Utilities, click Utilities and select Setup, then select the printer and click OK.
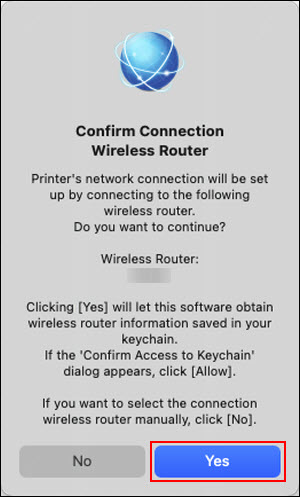
The printer will look for nearby networks. Click Yes for the message that appears.
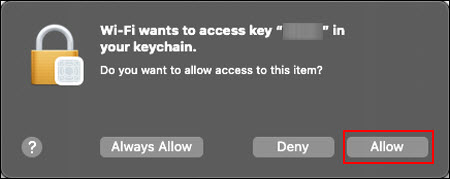
After a few moments, you will be prompted to allow access to the network information in your keychain. Select Allow.
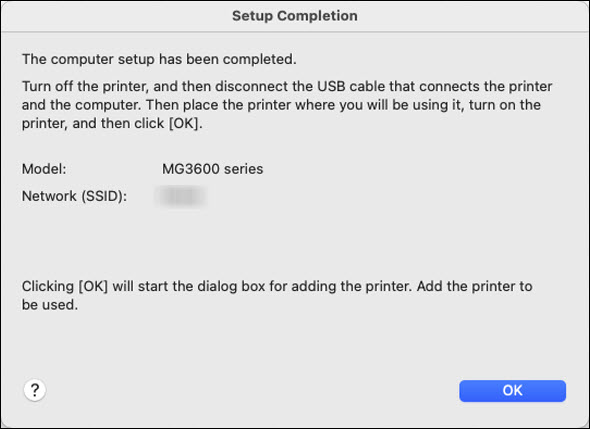
After a few moments, the Setup Completion message will appear.
Before selecting OK, open System Settings / System Preferences, then go to Printers & Scanners (the name may vary depending on which version of macOS is installed on your computer).
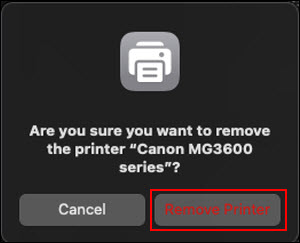
You will see at least one listing for the PIXMA MG3600 Series printer in your printer list. This listing appeared after the printer was connected to the computer via USB. Select the printer, then select Remove Printer.
When prompted to confirm removing the printer, select Remove Printer.
For macOS versions prior to macOS 13, select the printer from the list, then click the minus (-) sign below the printer list. Then, select Remove Printer or the appropriate option to confirm printer removal.
After removing the listing(s) for the MG3600 Series, select OK in the Setup Completion window (from step 8).
In the Add Printer dialog, wait for the Canon IJ Network listing for the printer to appear. Select it, then select Add.
The printer is added to the printer list and ready for use on your wireless network.
To set up your PIXMA MG3620 to connect to a wireless network using a Mac, follow the steps below.
After installing these items, connect a USB cable to the back of the printer and into a USB port on your computer.
Launch the IJ Network Tool on your computer (Look in Finder, then select Applications -> Canon Utilities > IJ Network Tool).
Select Use the printer on the network, then select OK.
Select your printer, then select OK.
If the tab at the upper left says Utilities, click Utilities and select Setup, then select the printer and click OK.
The printer will look for nearby networks. When the following message appears, select Yes.
After a few moments, you will be prompted to allow access to the network information in your keychain. Select Allow.
After a few moments, the Setup Completion message will appear.
Before selecting OK, open System Settings / System Preferences, then go to Printers & Scanners (the name may vary depending on which version of macOS is installed on your computer).
You will see at least one listing for the PIXMA MG3600 Series printer in your printer list. This listing appeared after the printer was connected to the computer via USB. Select the printer, then select Remove Printer.
When prompted to confirm removing the printer, select Remove Printer.
For macOS versions prior to macOS 13, select the printer from the list, then click the minus (-) sign below the printer list. Then, select Remove Printer or the appropriate option to confirm printer removal.
After removing the listing(s) for the MG3600 Series, select OK in the Setup Completion window (shown in step 8).
In the Add Printer dialog, wait for the Canon IJ Network listing for the printer to appear. Select it, then select Add.
The printer is added to the printer list and ready for use on your wireless network.
If your product issue was not resolved after following the steps above, or if you require additional help, please create or log in to your Canon Account to see your technical support options.
Or if you still need help, visit our Canon Community by clicking the button below to get answers:

 This printer can be set up wirelessly without a USB cable from a
  A USB cable is required.
 For macOS versions prior to macOS 13, select the printer from the list, then click the minus (-) sign below the printer list. Then, select Remove Printer or the appropriate option to confirm printer removal.