Languages
This article is available in the following languages:
|
Load paper correctly into the Front Feeder - Pro9500 / Pro9500 Mark II
| Article ID: ART122553 |
| |
Date published: 05/12/2015 |
| |
Date last updated: 08/17/2015 |
Solution
Loading Paper into the Front Feeder
When printing on heavy or thick paper, load paper into the front feeder using the instructions below:
- Keep a space of 15.7 inches behind the printer. When printing from the front tray, the paper temporarily sticks out from the back of the printer.
-
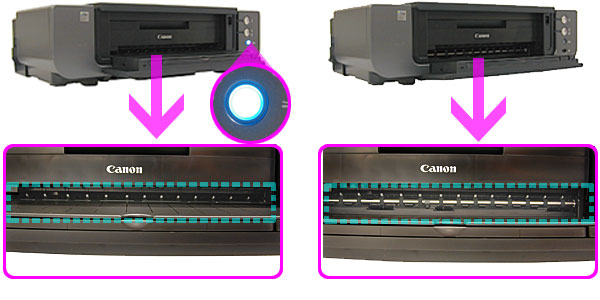
Ensure that the front tray is opened and set it in the front paper feeding position. Close the front tray halfway, and then prepare for lifting the tray (images 1 - 5). Lift the tray; if the tray is properly lifted, the Front Feed button will be lit (image 6). While holding the tray at the level the button was lit, open up the tray; then, the printer will be ready for front paper feeding (images 7 - 10).
Note: If the Front Feed button is not lit, the front tray is not set in the front paper feeding position. Set it again.
a. The front tray is set in the front paper feeding position.
|
b. The front tray is not set in the front paper feeding position.
|
|
|
- Pull out the front tray extension < 1 > completely, press the Rear Support button < 2 >, and then press the Front Feed button < 3 >.
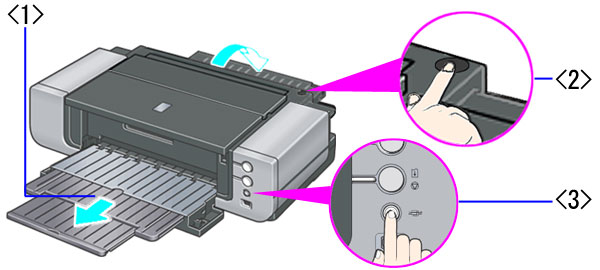
Note: If the Alarm lamp of the printer is flashing for three times at a time, after opening the rear support, press the Resume/Cancel button to release the error.
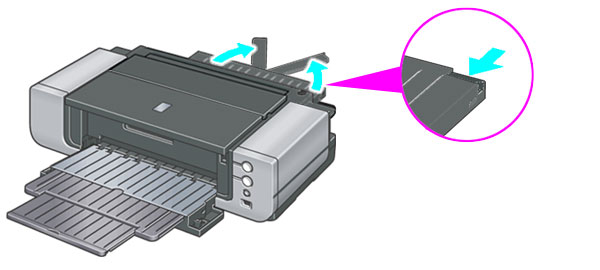
- When loading the paper that is longer than Letter size paper, press the right corner of the rear support to open the rear support extension.
- Ensure that the Power lamp is flashing, and the Front Feed button is flashing quickly twice at a time.
Note: If you leave the printer for more than 5 minutes while the Front Feed button flashes quickly, the Front Feed button stops flashing and stays lit. If this happens, press the Front Feed button again and confirm that it starts flashing.

- Load the paper with the print side facing up, aligning its right edge to the right edge of the front tray.
Note: Align the front edge of the paper with the arrow-marked line on the front tray.
- Press the Front Feed button. After the printer takes in the paper, the Front Feed button flashes slowly.
- The printer is now ready to print from the front feeder.
Select the Correct Paper Source (via the computer)
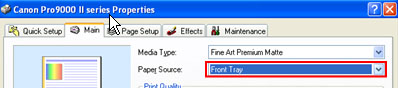
Windows
- Select the command you use to perform printing from the program you are using. (Typically, you will select 'Print' from the 'File' menu to open the 'Print' dialog box.)
- Select your printer and then click 'Preferences' (or 'Properties').

- From the 'Properties' window, click the 'Main' tab.
- Select 'Front Tray' from the Paper Source drop-down menu.
Macintosh
- Select the command you use to perform printing from the program you are using. (Typically, you will select 'Print' from the 'File' menu to open the 'Print' dialog box.)
- From the 'Printer' pop-up menu, select the printer you are using.
- In the third pop-up menu, select 'Quality & Media'.
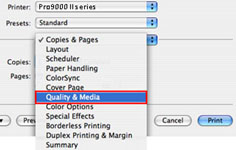
- Select 'Front Tray' from the 'Paper Source' pop-up menu.
Attention!
- Only one sheet of paper at a time can be fed from the front tray.
- Paper must be loaded within 5 minutes from the time paper loading mode has been set, and the front loading button starts blinking. If the button stops blinking and is lit steadily, push front loading button again to return to the loading position, and then load the paper.
- If the rear support tray is not opened, the error light blinks in 3 consecutive flashes. In this case, open the rear support tray as described in step 1, and then press the "Resume" button.
- Envelopes, 4x6" size, and Panorama must be fed from the rear tray feed.
- To print from the rear feed, return the front tray to its original (lowered) position. (Reverse step 2b)
|
