|
Configure port settings on your computer to print to the machine.
| Configure port settings on your computer when: | Steps to take |
| Installing the printer driver using [Add
Printer]. | Note that a different IP address is assigned to the installed printer driver. To use the IP address of the machine, configure port settings on your computer after installation. |
| Changing the IP address of the machine. | Configure port settings on your computer to use the IP address of the machine. |
NOTE
The dialog box that appears on your computer
- The dialog box may vary slightly, depending on the version of your operating system.
1. Open the printer folder.
- Windows XP Professional, and Server 2003
From the [Start] menu, select [Printers and Faxes].
From the [Start] menu, select [Control Panel], click [Printers and Other Hardware] and [Printers and Faxes].
From the [Start] menu, select [Control Panel] and click [Printer].
- Windows 7, and Server 2008 R2
From the [Start] menu, select [Devices and Printers].
From the [Start] menu, select [Control Panel], and then double-click [Printers].
- Windows 8, and Server 2012
Right-click the lower-left corner of the screen, select [Control Panel], and then click [View devices and printers].
2. Right-click the icon for the machine and select [Printer properties] (or [Properties]).

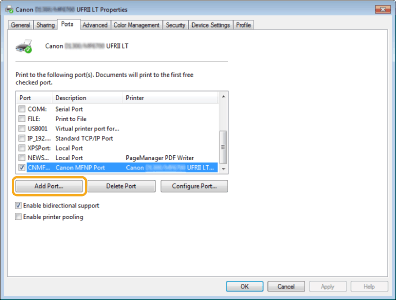
3. Click the [Ports] tab.

4. Click [Add Port].
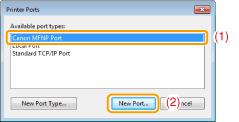
5. Select [Canon MFNP Port] for [Available port types] and click [New Port].
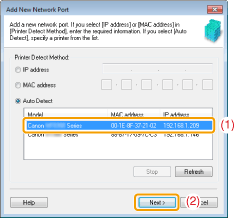
6. Click [Auto Detect].

NOTE
When you cannot perform Auto Detect
- Enter the IP address or MAC address of the machine manually.
- For details on the procedures for checking the IP address of the machine, see the "e-Manual" (HTML manual) in the CD-ROM supplied with the machine.
- For details on the procedures for checking the MAC address of the machine, see the "e-Manual" (HTML manual) in the CD-ROM supplied with the machine.
7. Select the detected printer and click [Next].
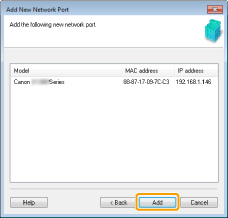
8. Click [Add].
9. Click [Finish].

10. Click [Close].
11. Click [Apply].
|

