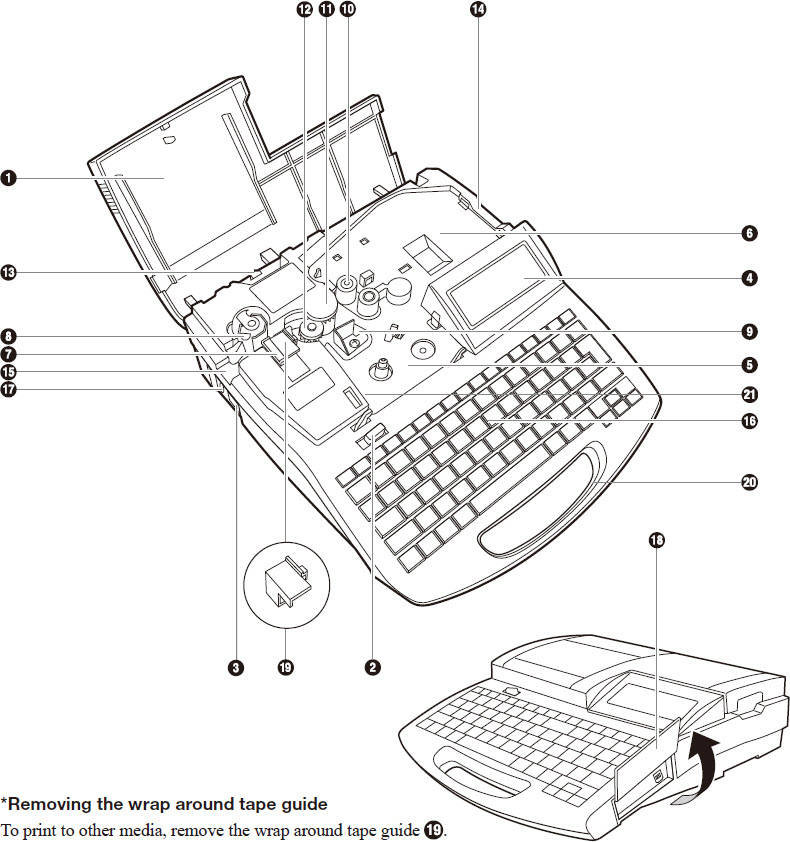
Main Unit
-
Pull out the cutter.
|
-
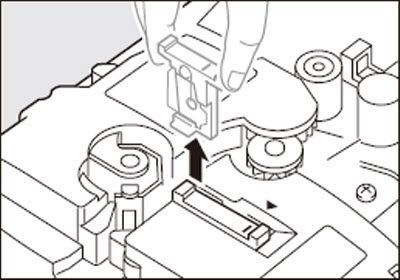
Pull out the wrap-around tape guide.
|
-
Reinstall the cutter.
|
|
|
|
|
-
Cover
Open this cover when you need to load a cassette or tube.
|
-
Transport roller 2
This roller feeds printing media past the print head.
|
-
Cover release
Pull this lever to the left to open the cover.
|
-
Transport roller 3
This roller feeds printed printing media to the cutter.
|
-
Power switch
Use this switch to turn the power on and off. Flip the switch to the "|" position to turn the power on, and flip the switch to the "O" position to turn the power off.
|
-
Transport roller 3 release lever
Pull this lever to the right to release transport roller 3. Use this lever when clearing jammed printing media.
|
-
LCD screen
Displays text that has been entered or the information about settings.
|
-
Media intake
Insert tube or plate here (when attachment installed).
|
-
Ribbon cassette holder
Place the ribbon cassette holder.
|
-
Outlet
Printed printing media emerges here.
|
-
Mounting location for attachment or printing media cassette
Mount the tube attachment or label tape cassette here. The option Tube Warmer also mounts here.
|
-
Keyboard
Enter text to be printed and data for settings through this keyboard.
|
-
Cutter
The cutter cuts printing media automatically. The cutter can be replaced.
|
-
AC adapter connector
Connect the AC adapter cable here.
|
-
Cutter receiver
This is the receiver for the cutter blade when cutting printing media. When the cutter is replaced, the cutter receiver is replaced at the same time.
|
-
Interface cover
Open this cover to connect the USB cables of the PC connection kit.
|
-
Print head
This device prints by applying heat to a ribbon. As it becomes very hot, do not touch this device while printing is in progress or immediately after printing.
|
-
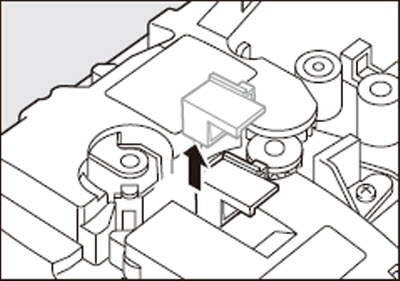
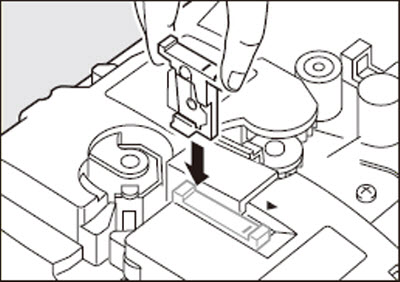
Wrap around tape guide
This guide is installed when printing on wrap around tape. Remove it when printing to other meia.
|
-
Transport roller 1
This roller feeds printing media to the print head.
|
-
Handle
Hold this handle when carrying the printer.
|
|
|
-
Connector for ribbon cassette
This is to read out information of the ribbon cassette. Do not touch and deform the connector.
|
If your product issue was not resolved after following the steps above, or if you require additional help, please create or log in to your Canon Account to see your technical support options.
Or if you still need help, visit our Canon Community by clicking the button below to get answers:

____________________________________________________________________________________________
