Wireless Connection
Prior to starting setup on the computer, smartphone or tablet device, start Easy wireless connect on the printer. Then complete the setup on the computer or device.
See the procedure below to start Easy Wireless connect.
-
Make sure that the printer is powered on.
If the power is on, the ON lamp (A) will be lit.
-9?scl=1)
If the printer is performing cleaning, print head alignment, or other processes
Wait for the process to finish, before starting setup.
-
Press the HOME button (B) on the printer.
If an error screen is displayed, press the OK button, then press the HOME button.
-6?scl=1)
-
Use the -6?scl=1)
-13?scl=1)
-1?scl=1)
 buttons (C) to select
buttons (C) to select -16?scl=1) (D).
(D).
?scl=1)
- Press the OK button.
-
Select LAN settings and press the OK button.
-7?scl=1)
-
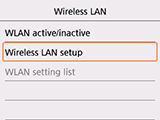
Select Wireless LAN and press the OK button.
-3?scl=1)
-
Select Wireless LAN setup and press the OK button.

-
Select Easy wireless connect and press the OK button.
-31?scl=1)
-
Select Yes and press the OK button.
-23?scl=1)
-
When the printer preparation is complete, the screen below appears.
-19?scl=1)
The printer is now ready to receive the information it needs to connect to your wireless network.
Select the computer's operating system or mobile device you are using for setup instructions.
Windows
macOS
iOS / iPadOS
Android
ChromeOS
If your product issue was not resolved after following the steps above, or if you require additional help, please create or log in to your Canon Account to see your technical support options.


